Aria Operations Alert Notification Test Enhancement

This time a short blog about a new feature in Aria Operations 8.14.1 that I discovered by accident. Normally when you have created an alert notification and want to test it, an actual alert has to be created and takes up to 5 minutes each time before the alert is sent. If you have an Aria Operations and a vSphere test environment you will be fine generating an alert as a test.

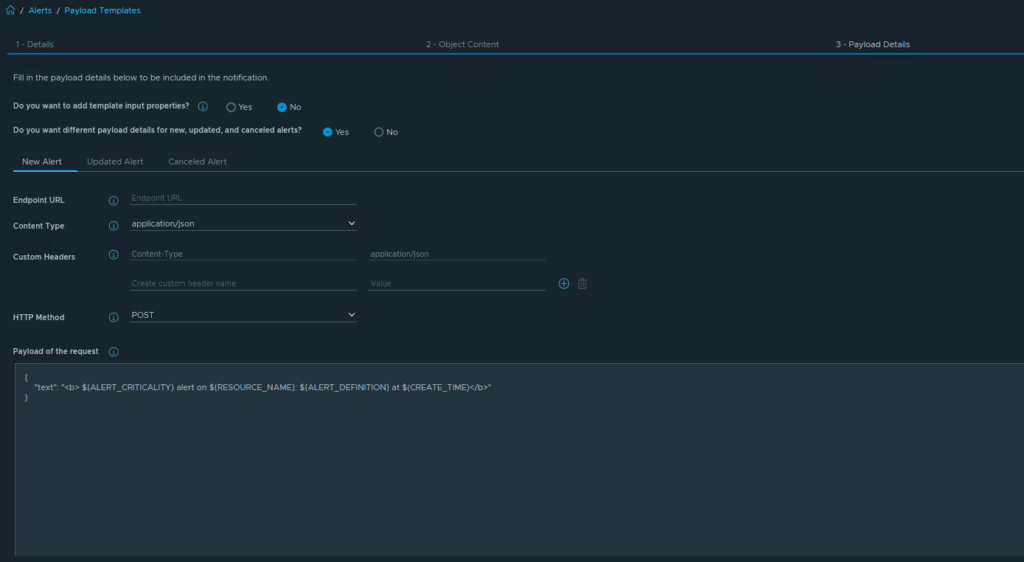
As an example, an alert notification, e.g. “Host has lost connection to vCenter Server”. The following screenshot details the steps to create an alert notification as follows as it goes up to Aria Operations 8.14.

After creation, you can only test the alert by disconnecting a host from vCenter. In a test environment this is not a problem, but in a production environment this is often not preferred.

What’s new in Alert notifications in Aria Operations 8.14.1

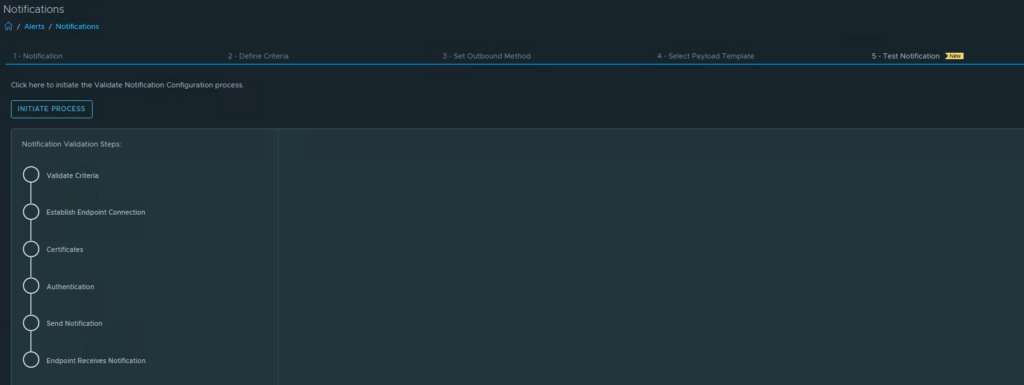
Nothing has changed about creating an alert notification except that an additional new step “Test Notifcation” has been added.

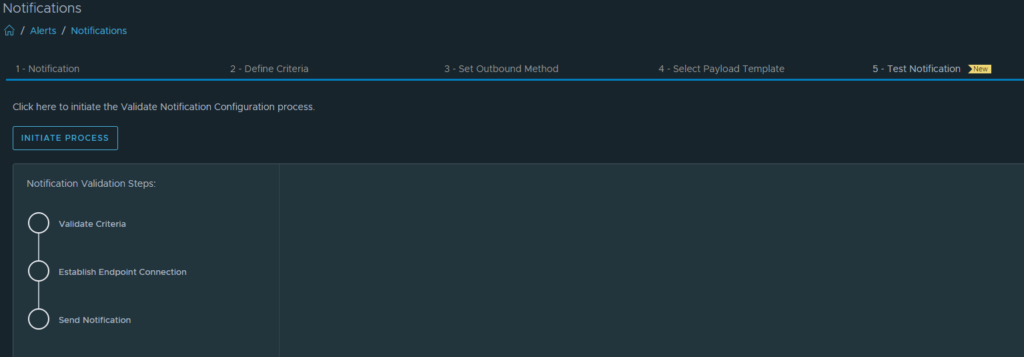
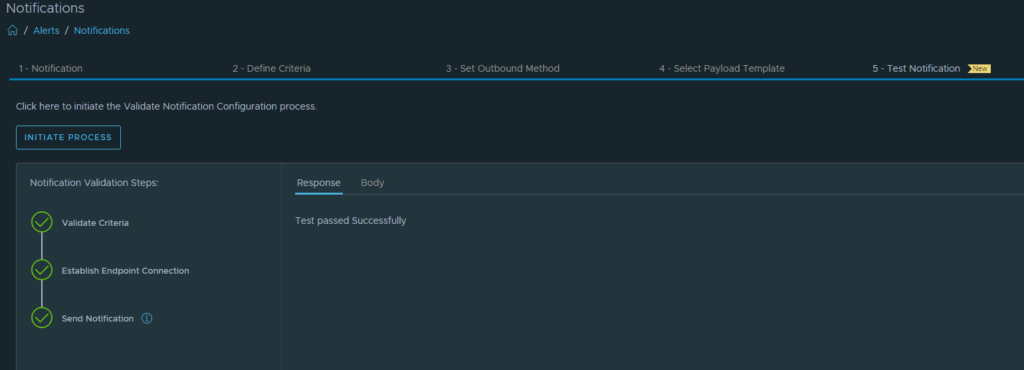
Go direct to Test Notification and select INITIATE PROCESS.

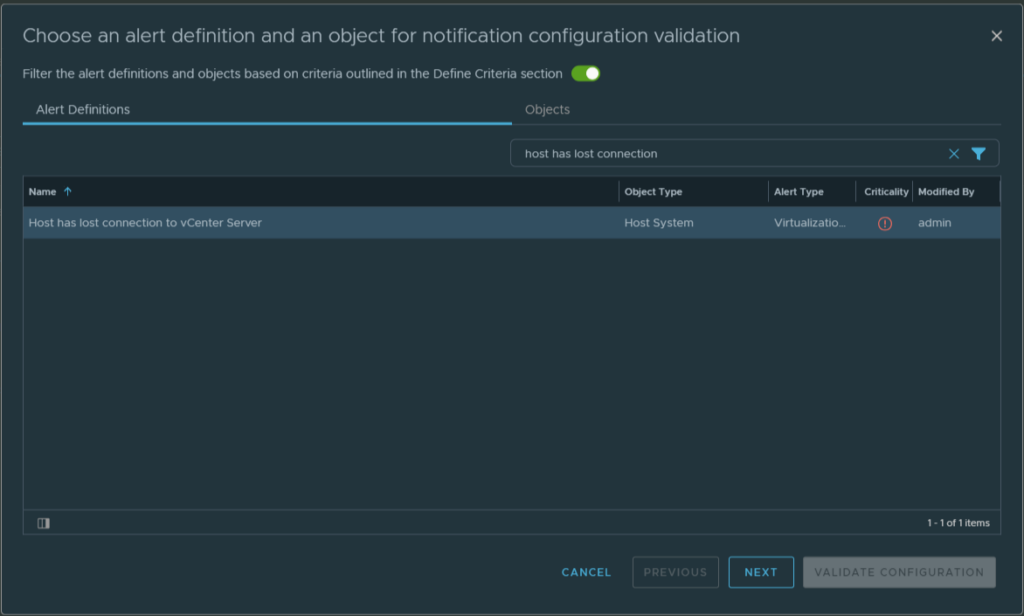
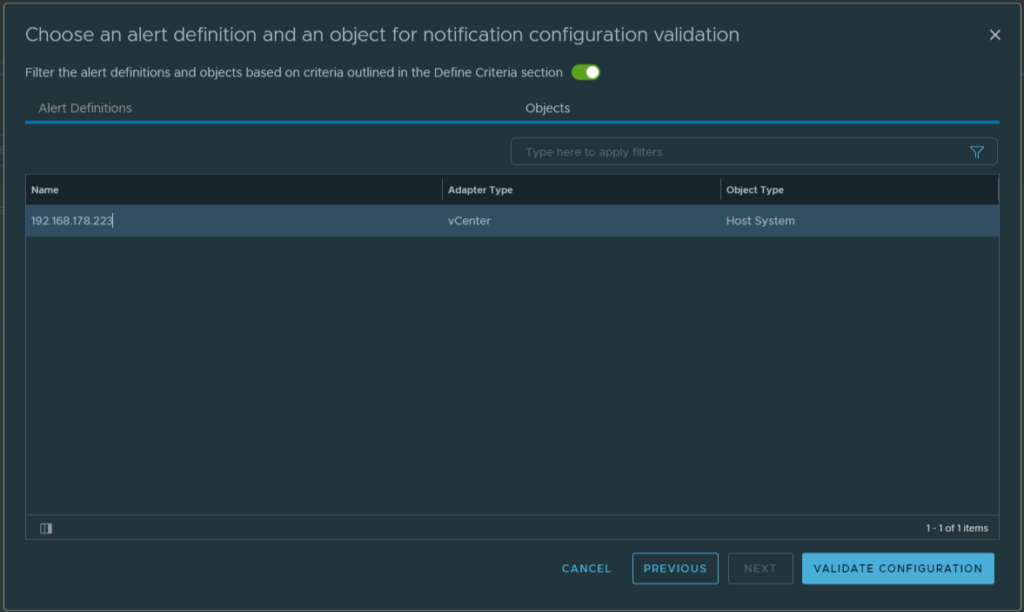
A new window pop-up. We choose as object “Host has lost connection to vCenter Server”, select this rule, turn-on the filter switch, Next

Because we turned on the filter switch in the previous step, we now see only the objects we can test. I have selected a ESXI host. Finally hit the VALIDATE CONFIGURATION button.

Response: Test passed successfully.

If we now look at the alert body we see that an SNMP trap has been sent. We can compare this data with what SNMP trap receiver has received.

Output SNMP trap receiver shows the data that was send as test.

Conclusion:
This small addition is a big step forward in testing alert notications in Aria Operations. We can now test against a production environment without having to generate an actual alert.

Forward Aria Operations alerts as SNMPv3 traps to Ubuntu

Last week I wrote about forwarding Aria Operations alerts with SNMPv3. Since Ubuntu is widely used I have decided to test also Ubuntu in my lab.

In this blog post I will describe the steps taken to send an SNMPv3 trap from Aria Operations to Ubuntu where the traps are stored readably in a log file. For this test, I used the following configuration:

  • VMware vCenter 8.0 update 2a
  • VMware ESXi 8.0 update 2
  • VMware Aria Operations version: 8.14.1
  • Linux Ubuntu 22.04.3 LTS
  • NET-SNMP 5.9.1

First step: Configure Aria Operations SNMP Trap Instance (Configure > Alerts > Outbound Settings > Add)

The name of the SNMP instance in my lab is “SNMP-Alpine-Linux”

The data highlighted in green later is needed later when configuring the Linux SMMP trap collector. For both the Authentication Password and Privacy Password, we use the same password, which is “T3st123!”.

Second step: Install and configure the Linux SNMP trap collector.

Install Ubuntu 22.04

Once Ubuntu is installed, snmptrapd need to be installed. Note that from version NET-SNMP 5.9.x onwards, AES256 can be used, which is needed to decode SNMPv3 traps.

Install snmptrapd

apt-get update
apt-get -y install snmptrapd
apt update
apt -y install snmptrapd

Create /var/log/snmptrapd.log

touch /var/log/snmptrapd.log
chmod 666 /var/log/snmptrapd.log

Modify /usr/lib/systemd/system/snmptrapd.service to write traps to /var/log/snmptrapd.log

#Modify snmptrapd.service 
#Comment out the next line
#ExecStart=/usr/sbin/snmptrapd -LOw -f udp:162 udp6:162
#Add the next line
ExecStart=/usr/sbin/snmptrapd -LOw -f udp:162 udp6:162 -Lf /var/log/snmptrapd.log

Modify /etc/snmp/snmptrapd.conf

#Add the next lines
disableAuthorization yes
authCommunity log,execute,net public
createUser -e 687570118567EE5F48839F4D0C2B8AE5312C ariaops SHA-256 T3st123!! AES-256 T3st123!!
authUser log,execute,net ariaops
format2 %.4y-%.2m-%.2l %.2h:%.2j:%.2k %B [%b]:\n%v\n
outputOption s

Reload snmptrapd

systemctl daemon-reload
systemctl restart snmptrapd.service

Add Ubuntu MIB files

apt-get install snmp-mibs-downloader

Download the Aria Operations MIB files from the Aria Operations appliance. See VMware KB2118780. This is needed to convert the Aria Operations in readable alerts in the snmptrapd.log. See the next two Aria Operations test traps why the Aria Operations MIB files are needed.

First screenshot, the Aria Operations MIB files are not imported in Alpine. It cannot be seen that these alerts are VMware alerts

Next screenshot, the Aria Operations MIB files are imported in Alpine. Now it is clear that these are VMware events.

#Download the Aria Operations MIB files from this directory 
/usr/lib/vmware-vcops/user/plugins/outbound/vcops-snmptrap-plugin/mib

Upload the Aria Operations MIB files from the Aria Operations appliance to Alpine

#Upload the Aria Operations MIB files into this directory
/usr/share/snmp/mibs

Modify /etc/snmp/snmp.conf

#Comment out mibs 
#mibs :

#Add custom Aria Operations MIB files
mibs +VMWARE-ROOT-MIB
mibs +VMWARE-VROPS-AGENTCAP-MIB
mibs +VMWARE-VROPS-MIB
mibs +VMWARE-PRODUCTS-MIB

Restart snmpd and snmptrapd

systemctl restart snmpd.service
systemctl restart snmptrapd.service

Third step: Test if Aria Operations SNMPv3 traps are received on the Linux SNMP collector

Test 1: Sending a test trap from the Aria Operations SNMP instance.

Note that before testing both password have been entered. Otherwise the test will fail.

Hit the “TEST” button. The following message will appear.

Check the snmptrapd.log (tail -f /var/log/snmptrapd.log) and search for “Test Notification Rule”

We see “Test Notification Rule” in the snmptrad.log. Test is succeeded.

Test2: Disconnect a ESXi host from vCenter

I have created a notification that wil send a SNMP trap to the LinuxSNMP collector.

Disconnect ESXi host from vCenter:

Alert is raised in Aria Operations

Check the snmptrapd.log (tail -f /var/log/snmptrapd.log) and search for “Host disconnected from vCenter”

We see “Host disconnected from vCenter” in the snmptrad.log. Test is succeeded.

From here, the alerts can move on to the third-party monitoring tool. That is beyond the scope of this test. Hopefully this blog post is useful to you.

Forward Aria Operations alerts as SNMPv3 traps to a Linux collector

Recently a question came up whether it is possible to forward Aria Operations alerts to a third-party monitoring tool using SNMPv3. I had no experience with this until that point. During this exploration it turns out that there is a lot of information to be found about configuring a SNMPv3 target. It turned out to be quite a search to find the right information to be able to decode the SNMPv3 traps and write them readable away in a log file. I tested with several types of Linux, including Raspberry Pi and Rocky Linux 9, but in the end I succeeded with Alpine Linux. An added advantage of Alpine is that it is lightweight.

In this blog post I will describe the steps taken to send an SNMPv3 trap from Aria Operations to a Linux collector where the traps are stored readably in a log file. For the test, I used the following configuration:

  • VMware vCenter 8.0 update 2a
  • VMware ESXi 8.0 update 2
  • VMware Aria Operations version: 8.14.1
  • Linux Alpine Standard 3.19.0 x86_64
  • NET-SNMP 5.9.4

First step: Configure Aria Operations SNMP Trap Instance (Configure > Alerts > Outbound Settings > Add)

The name of the SNMP instance in my lab is “SNMP-Alpine-Linux”

The data highlighted in green later is needed later when configuring the Linux SMMP trap collector. For both the Authentication Password and Privacy Password, we use the same password, which is “T3st123!”.

Second step: Install and configure the Linux SNMP trap collector.

Install Alpine Linux. Click here for the Alpine Wiki.

Once Alpine is installed, NET-SNMP can be installed. Note that from version NET-SNMP 5.9.x onwards, AES256 can be used, which is needed to decode SNMPv3 traps.

Install NET-SNMP

apk update && apk add net-snmp net-snmp-tools

Modify /etc/snmp/snmp.conf

In this step we will need the green marked higlighted data from the Aria Operations SNMP instance.

#######################################################################
# Example configuration file for snmptrapd
#
# No traps are handled by default, you must edit this file!
#
# authCommunity   log,execute,net public
# traphandle SNMPv2-MIB::coldStart    /usr/bin/bin/my_great_script cold
########################################################################

authCommunity log,execute,net public

#AriaOps

#createUser -e <ENGINE-ID> <USERNAME> <AUTHENTICATION PROTOCOL> <AUTHENTICATION PASSWORD> <PRIVACY PROTOCOL> <PRIVACY PASSWORD>

createUser -e 687517EA587080304ED28C73A0FB0B676570 ariaops SHA-256 T3st123! AES-256 T3st123!

######################################
authUser log,execute,net ariaops

format2 %.4y-%.2m-%.2l %.2h:%.2j:%.2k %B [%b]:\n%v\n

outputOption s

Modify /etc/conf.d/snmptrapd

Here we unmark #OPTS=”${OPTS} -Lf /var/log/snmptrapd.log” so snmp traps will be logged in /var/log/snmptrapd.log.

# extra flags to pass to snmptrapd
OPTS=""

# ignore authentication failure traps
#OPTS="${OPTS} -a"

# log messages to specified file
OPTS="${OPTS} -Lf /var/log/snmptrapd.log"

# log messages to syslog with the specified facility
# where facility is: 'd' = LOG_DAEMON, 'u' = LOG_USER, [0-7] = LOG_LOCAL[0-7]
#OPTS="${OPTS} -Ls d"

Restart snmptrapd

/etc/init.d/snmptrapd restart of systemctl restart snmptrapd

Create snmptrapd.log

touch /var/log/snmptrapd.log

Download the Aria Operations MIB files from the Aria Operations appliance. See VMware KB2118780. This is needed to convert the Aria Operations in readable alerts in the snmptrapd.log. See the next two Aria Operations test traps why the Aria Operations MIB files are needed.

First screenshot, the Aria Operations MIB files are not imported in Alpine. It cannot be seen that these alerts are VMware alerts

Next screenshot, the Aria Operations MIB files are imported in Alpine. Now it is clear that these are VMware events.

#Download the Aria Operations MIB files from this directory 
/usr/lib/vmware-vcops/user/plugins/outbound/vcops-snmptrap-plugin/mib

Upload the Aria Operations MIB files from the Aria Operations appliance to Alpine

#Upload the Aria Operations MIB files into this directory
/usr/share/snmp/mibs

Create /etc/snmp/snmp.conf

touch /etc/snmp/snmp.conf

Add the custom Aria Operations MIB files to snmp.conf

#Add custom Aria Operations MIB files
mibs +VMWARE-ROOT-MIB
mibs +VMWARE-VROPS-AGENTCAP-MIB
mibs +VMWARE-VROPS-MIB
mibs +VMWARE-PRODUCTS-MIB

Restart snmpd and snmptrapd

/etc/init.d/snmpd restart
/etc/init.d/snmptrapd restart

Auto start snmpd and snmptrapd at boot

rc-update add snmpd default
rc-update add snmptrap default

Third step: Test if Aria Operations SNMPv3 traps are received on the Linux SNMP collector

Test 1: Sending a test trap from the Aria Operations SNMP instance.

Note that before testing both password have been entered. Otherwise the test will fail.

Hit the “TEST” button. The following message will appear.

Check the snmptrapd.log (tail -f /var/log/snmptrapd.log) and search for “Test Notification Rule”

We see “Test Notification Rule” in the snmptrad.log. Test is succeeded.

Test2: Disconnect a ESXi host from vCenter

I have created a notification that wil send a SNMP trap to the LinuxSNMP collector.

Disconnect ESXi host from vCenter:

Alert is raised in Aria Operations

Check the snmptrapd.log (tail -f /var/log/snmptrapd.log) and search for “Host disconnected from vCenter”

We see “Host disconnected from vCenter” in the snmptrad.log. Test is succeeded.

From here, the alerts can move on to the third-party monitoring tool. That is beyond the scope of this test. Hopefully this blog post is useful to you.

Upgrade Aria Operations 8.12 to 8.14 fails

There is a known issue occurring with some Aria Ops upgrades from version 8.12 to 8.14. During the upgrade Aria Ops is hanging for some time and lose access to the Admin UI. The Admin UI does not come back. The issue is related due the Photon OS upgrade.

VMware Support has confirmed that Aria Ops 8.14 will be replaced shortly by Aria Ops 8.14 hotfix 1. Unlike the normal upgrade process, it will be possible to upgrade directly from Aria Ops 8.12 to 8.14 hotfix 1.

VMware Support’s advice is to wait a while before upgrading until Aria Ops 8.14 hotfix 1 is available.

Update November 22, 2023

Last night VMware released Aria Operations Upgrade PAK | 2023 | Build 22611353 . Read the complete release note here.

UPDATE: Aria Operations for Logs persistent static route on second network interface on behalf of Log Forwarding

There is an update on the blog post “vRealize Log Insight persistent static route on second network interface on behalf of Log Forwarding”. Beginning with version Aria Operations for Logs 8.14, the VAME_CONF_NET is no longer available, it’s removed in this version.

The information in the orignal blog post can still be used. Only now you need to manually create and predefine the 10-eth1.network configuration. See example at the bottom of the original post.

There are two important things to consider:

  1. Keep in mind that multic-nic configurations in Aria Ops for Logs is not officially supported
  2. After every update the 2nd interface must be recreated and configured again

Orginal post:

Recently I wanted to test whether it is possible to configure vRealize Log Insight (vRLI) log forwarding to a second network interface to reach a log target in another network segment that could not be reached from the default vRLI appliance ip address.

The first step is adding a second network interface to the appliance. In this example we use the following network configuration.

  1. VMnic1
    Vlan10, IP 10.1.1.10, Subnetmask 255.255.255.0, Gateway 10.1.1.1
  2. VMnic2
    Vlan20, IP 20.2.2.20, Subnetmask 255.255.255.0, Gateway 20.2.2.1
  3. In this example the log forwarding target ip address is 30.3.3.233

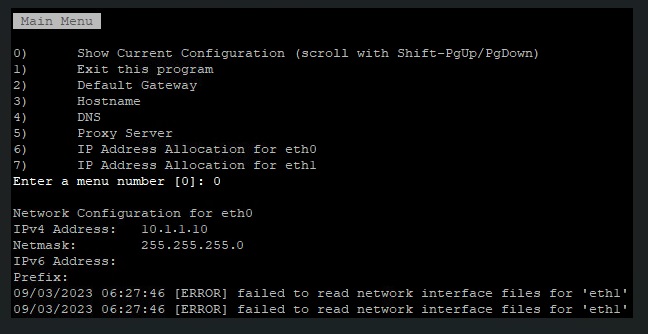
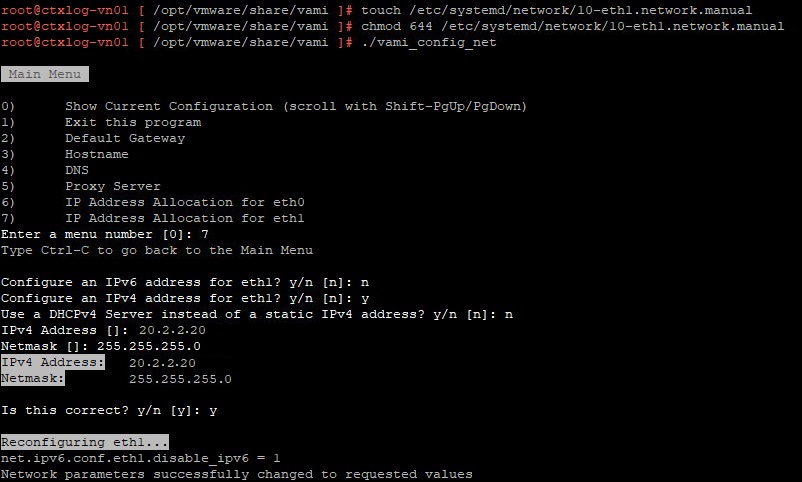
To configure the second network interface open a SSH session to vRLI appliance. Move to /opt/vmware/share/vami/ and run the network configuration script. vami_config_net. Eth1 is now also available for configuration. First select ‘0’ for a configuration overview. In the results is an error on eth1 displayed. This error keeps us from being able to configure eth1.

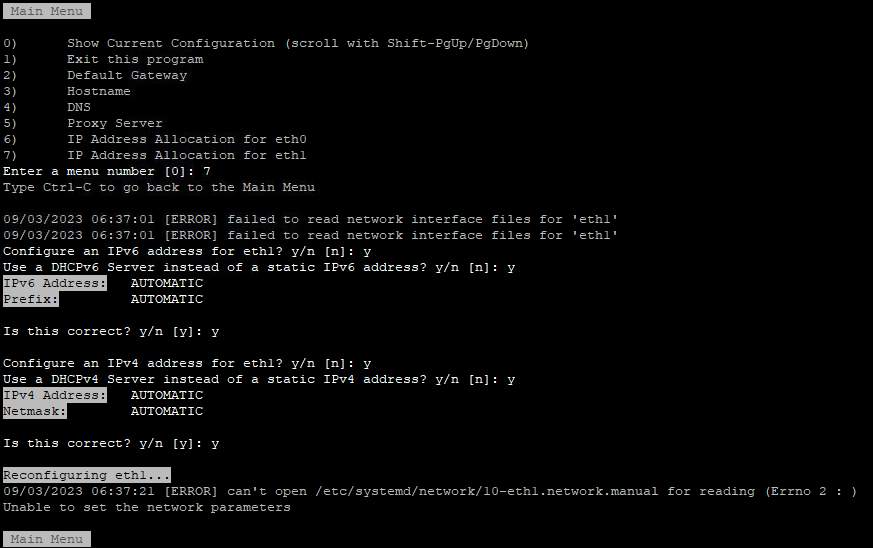
After some ‘Trial & Error’ research I noticed the following error during reconfiguring eth1 “can’t open /etc/systemd/network/10-eth1.network

In the directory /etc/systemd/network is the file “10-eth1.network” not present. The name of the file could be different then here in this example. It depends on the number of network interfaces. I fixed this issue by creating this file manual.

  1. touch /etc/systemd/network/10-eth1.network
  2. chmod 644 /etc/systemd/network/10-eth1.network
  3. Config the second network interface. Go to the directory /opt/vmware/share/vami/ and run the network configution script. vami_config_net. Eth1 is now also available for configuation.
  4. Check the new configuration by selecting option 0. If Ok press 1 to exit
  5. Restart the network, systemctl restart systemd-networkd.service

Now this issue is fixed we can move on to configure the persistant static route for vRLI log forwarding.

Edit /etc/systemd/network/10-eth1.network

The file shlould look like this before editing:

[Match]
Name=eth1
[Network]

Gateway=10.1.1.1
Address=20.2.2.20/24
DHCP=no

[DHCP]
UseDNS=false

Now add route information at the end of the file:

[Match]
Name=eth1
[Network]

Gateway=10.1.1.1
Address=20.2.2.20/24
DHCP=no

[DHCP]
UseDNS=false
[Route]
Gateway=20.2.2.1
Destination=30.3.3.233/24

Save the file and restart the network service.

systemctl restart systemd-networkd.service

Check if the new route is present.

route -n

Test if you reach the destionation from CLI. I used Syslog over UDP port 514.

nc -v 30.3.3.233 514

Answer if configuration is working:

[30.3.3.233 514] open

The last step is to configure the vRLI Log Forwarding Destination.

Send a test event and check if the event is received by the target.

Keep in mind that multic-nic configurations in vRLI are not officially supported.

Also credits to this blog post that pushed me in the right direction.

PowerCLI script to get Syslog.Global.Host advanced setting

The following script may be useful if you are in the process of migrating vRealize Log Insight to a new appliance/cluster. You can use this script before, during and after migrating to check the settings of Syslog.Global.Loghost of all ESXi hosts in vCenter.

# Connect to vCenter Server
Connect-VIServer <vCenterServer>

# Get all ESXi hosts in the cluster
$hosts = get-vmhost

# Loop through each ESXi host and get the syslog.global.loghost advanced setting
foreach ($esxi in $hosts) {
    $setting = Get-AdvancedSetting -Entity $esxi -Name 'syslog.global.loghost'
    Write-Host "$($esxi.Name): $($setting.Value)"
}

# Disconnect from vCenter Server
Disconnect-VIServer <vCenterServer> -Confirm:$false

For example: You can use the script during vRealize Log Insight in the following way:

  • Before migration
    Check the current configured syslog endpoint
  • During migration
    Check the current and new syslog endpoints are configured
  • After migration
    Check the new configured syslog endpoint

vRealize Log Insight Admin Alert: SSL Certificate Error (Host =vrli.vrmware.nl)

This time a short post about a vRealize Log Insight (vrLI) configuration issue that took too long to solve. In the end, the solution is simple after I found the documentation. Finding the right documentation was the hardest part.

Just briefly the reason of this setup. I want ESXi hosts to use Syslog over SSL to send logging encrypted to vRLI.

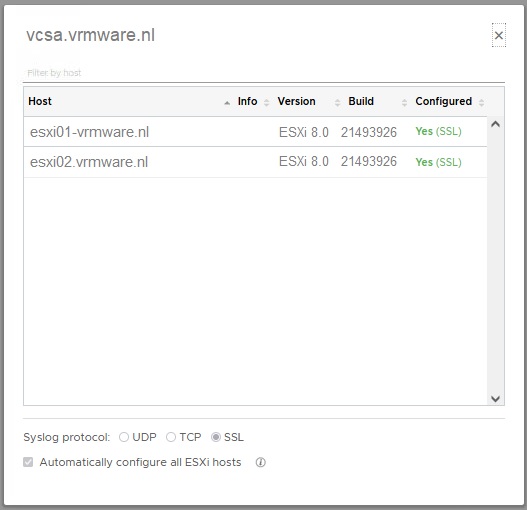
While adding the vCenter I configured the hosts to use SSL.

After configuring, everything seemed to work fine, until I got a vRLI Admin mail with the following alert:

This alert is about your Log Insight installation on https://vrli.vrmware.nl/

SSL Certificate Error (Host = vrli.vrmware.nl) triggered at 2023-04-16T09:23:53.412Z

This notification was generated from Log Insight node (Host = vrli.vrmware.nl, Node Identifier = de568ad3-d4e3-7f8a-b543-cef17632af11).

Syslog client esx01.vrmware.nl disconnected due to a SSL handshake problem. This may be a problem with the SSL Certificate or with the Network Time Service. In order for Log Insight to accept syslog messages over SSL, a certificate that is validated by the client is required and the clocks of the systems must be in sync.

Log messages from esx01.vrmware.nl are not being accepted, reconfigure that system to not use SSL or see Online Help for instructions on how to install a new SSL certificate .

This message was generated by your Log Insight installation, visit the Documentation Center for more information.

Time couldn’t be the issue in my case. So it had to be a certificate issue. The issue was caused by the vRLI certificate that wasn’t in the ESXi host truststore.

Per ESXi host, the following steps should be taken to solve the issue. Step 3 is only a verification step.

  1. openssl s_client -connect [FDQN or IP vRLI]:1514 < /dev/null | openssl x509 -outform PEM >> /etc/vmware/ssl/castore.pem
    Example: openssl s_client -connect vrli.vmware.nl:1514 < /dev/null | openssl x509 -outform PEM >> /etc/vmware/ssl/castore.pem
  2. esxcli system syslog reload
  3. esxcli network ip connection list | grep 1514

If ESXi hosts have the vRLI certificate in their truststore, the vRLI Admin mail (1x per day per vRLI node) should no longer occur.

Here is the link to the VMware documentation. This documentation is actually for vRLI Cloud which is a different product than standard vRLI although they overlap in some areas. The documentation for vRLI will be updated according to VMware GSS.

So this is probably why the vRLI documentation on this topic was so hard to find. Hopefully this blog post will save you a lot of time.

vRealize Log Insight persistent static route on second network interface on behalf of Log Forwarding

Recently I wanted to test whether it is possible to configure vRealize Log Insight (vRLI) log forwarding to a second network interface to reach a log target in another network segment that could not be reached from the default vRLI appliance ip address.

The first step is adding a second network interface to the appliance. In this example we use the following network configuration.

  1. VMnic1
    Vlan10, IP 10.1.1.10, Subnetmask 255.255.255.0, Gateway 10.1.1.1
  2. VMnic2
    Vlan20, IP 20.2.2.20, Subnetmask 255.255.255.0, Gateway 20.2.2.1
  3. In this example the log forwarding target ip address is 30.3.3.233

To configure the second network interface open a SSH session to vRLI appliance. Move to /opt/vmware/share/vami/ and run the network configuration script. vami_config_net. Eth1 is now also available for configuration. First select ‘0’ for a configuration overview. In the results is an error on eth1 displayed. This error keeps us from being able to configure eth1.

After some ‘Trial & Error’ research I noticed the following error during reconfiguring eth1 “can’t open /etc/systemd/network/10-eth1.network

In the directory /etc/systemd/network is the file “10-eth1.network” not present. The name of the file could be different then here in this example. It depends on the number of network interfaces. I fixed this issue by creating this file manual.

  1. touch /etc/systemd/network/10-eth1.network
  2. chmod 644 /etc/systemd/network/10-eth1.network
  3. Config the second network interface. Go to the directory /opt/vmware/share/vami/ and run the network configution script. vami_config_net. Eth1 is now also available for configuation.
  4. Check the new configuration by selecting option 0. If Ok press 1 to exit
  5. Restart the network, systemctl restart systemd-networkd.service

Now this issue is fixed we can move on to configure the persistant static route for vRLI log forwarding.

Edit /etc/systemd/network/10-eth1.network

The file shlould look like this before editing:

[Match]
Name=eth1
[Network]

Gateway=10.1.1.1
Address=20.2.2.20/24
DHCP=no

[DHCP]
UseDNS=false

Now add route information at the end of the file:

[Match]
Name=eth1
[Network]

Gateway=10.1.1.1
Address=20.2.2.20/24
DHCP=no

[DHCP]
UseDNS=false
[Route]
Gateway=20.2.2.1
Destination=30.3.3.233/24

Save the file and restart the network service.

systemctl restart systemd-networkd.service

Check if the new route is present.

route -n

Test if you reach the destionation from CLI. I used Syslog over UDP port 514.

nc -v 30.3.3.233 514

Answer if configuration is working:

[30.3.3.233 514] open

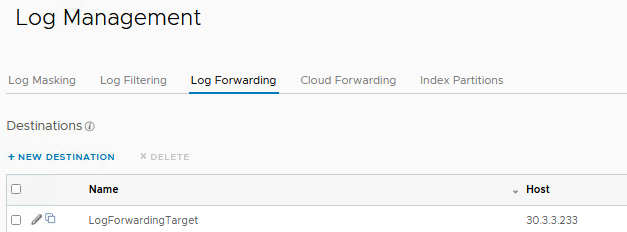
The last step is to configure the vRLI Log Forwarding Destination.

Send a test event and check if the event is received by the target.

Keep in mind that multic-nic configurations in vRLI are not officially supported.

Also credits to this blog post that pushed me in the right direction.

vRealize Log Insight failed to start Journal Service

Recently, I started an ssh session on a vRealize Log Insight (vRLI) appliance. After entering name and password a message was prompted to change the password immediately. After I did this, the ssh session was dropped and I had to log in again. The password appeared to be unchanged. I repeated this step several times and then decided to restart the vRLI appliance. Hoping this would fix the problem.

After waiting for some time, the appliance does not appear to come online and appears to be in a loop during startup. The screenshot below shows that the Journal Service does not want to start.

I have seen similar issue more often and I suspect a partition has filled up. I couldn’t log in because the appliance won’t start. In the following action plan, I explain step by step how I solved this problem.

Action Plan:

1, Take a snapshot
2. Edit the VM options in the next step before restarting the vm
3. Change Boot Options, Change Boot Delay in 1000 milliseconds and Force Bios Setup

4. Restart the VM
5. Bios Exit Discarding Changes

6. Press ‘E’ direct during the start
7. Type “rw init=/bin/bash” at the end of the line and press “F10”

8. Type “df -h”. In our case we see that the root partition is full

9. Let’s clean up some old audit and authentication logs

10. Let’s check the root partition again. Type “df -h”.

11. Reboot the appliance and we’re done.

After cleaning up the root partition, the appliance started normally. I was also able to change the root password without any problems. Don’t forget change the Boot Options, Change Boot Delay back in 0 milliseconds and remove the snapshot if everything is working fine and you’re happy with this solution.

You can always open a VMware SR if you need help. 🙂

Cannot install the vCenter Server agent(HA) service. Unknown installer error (UPDATE)

Almost two years ago I wrote a blogpost about a failure during installing the vCenter Server agent(HA) service. This post is one of most read articles on my blog. You can find the orginal post here. Recently, I ran into this problem again. This time I could not solve the problem using my earlier post.

I have found a workaround to this problem that is easy to implement and works well. I have been able to use it successfully several times recently.

  • Put the ESXi host in Maintenance Mode
  • SSH to the ESXi host
  • esxcli software vib remove -n vmware-fdm (no reboot needed)
  • Wait a few minutes and the result should like this:

Removal Result
  
Message: Operation finished successfully.
   Reboot Required: false
   VIBs Installed:
   VIBs Removed: VMware_bootbank_vmware-fdm_7.0.3-19193900
   VIBs Skipped:

  • Check if the vCenter Server agent is removed
  • esxcli software vib list | grep fdm (result should be empty)
  • Exit Maintenance Mode, HA agent will be installed
  • Check if the vCenter Server agent is installed
  • esxcli software vib list | grep fdm (result should be like this:
    vmware-fdm 7.0.3-19193900 VMware VMwareCertified 2022-10-12
  • Done